Time/Depth Velocity Modeling: Edit Velocity Grid
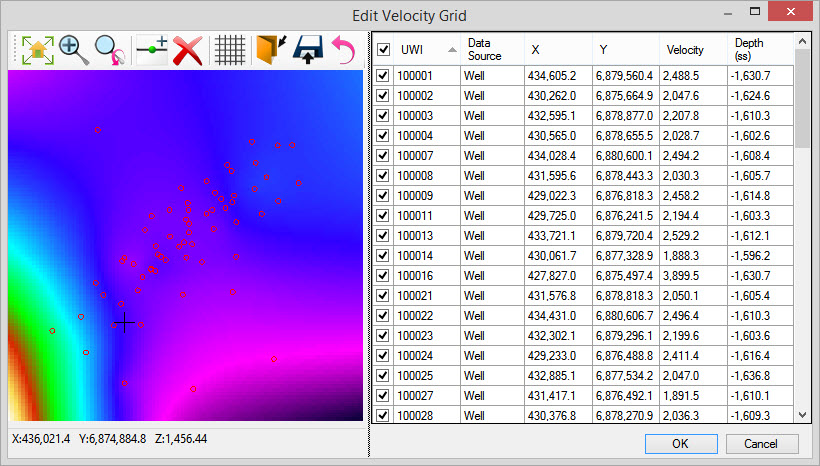
The Edit Velocity Grid window displays a thumbnail view of your velocity grid including the locations of the wells used in the calculation. A data table displays a list of the wells and inter-well picks used to create the velocity grid, and their associated data values, and can be used to remove individual wells and inter-well picks from the layer. Additional tools on the toolbar are used to create and remove inter-well picks, and re-grid the data after data points have been removed from and added to the layer.
To open this
window, click  below the velocity grid thumbnail image in the Display Grids dialog
box.
below the velocity grid thumbnail image in the Display Grids dialog
box.
How Do I Edit a Velocity Grid
Selecting Data Points |
Method
1: Select
the row from the
data grid on the right of the window, using the Ctrl key on the keyboard to select multiple rows. Method 2: Click and hold the left mouse button, and drag out a rectangle on the preview grid. All of the points within this rectangle will be selected in the data grid. |
How Do I Add an Inter-well Pick |
|
How Do I Update a Point |
|
How Do I Delete a Point |
|
How Do I Exclude a Point from the Calculation |
|
Toolbar

![]() Zoom to
Grid Extents:Display
the entire grid.
Zoom to
Grid Extents:Display
the entire grid.
![]() Zoom In:Zoom in on a region of the grid. Click and drag on the grid to select the area that you want to view in more detail.
Zoom In:Zoom in on a region of the grid. Click and drag on the grid to select the area that you want to view in more detail.
![]() Zoom to
Last Extent:Restore the previous zoom level and extents.
Zoom to
Last Extent:Restore the previous zoom level and extents.
Add Inter-Well Picks: Add an inter-well pick to the calculation to help control the shape of the output grid in areas with sparse well data. Enter a depth value, select a depth grid, or enter a velocity value in the Add Inter-well Picks dialog box, and then click on the grid to select a location. A new velocity value will be calculated, and added to the data table. Close the dialog box when you are finished adding points.
![]() Delete
Selected Data
Points: When you have a well point selected, this will delete the well from the layer. When you have an inter-well pick selected, this will permanently delete the inter-well pick. To remove an inter-well pick from a calculation without permanently deleting it, remove the check mark from the first column in the data table.
Delete
Selected Data
Points: When you have a well point selected, this will delete the well from the layer. When you have an inter-well pick selected, this will permanently delete the inter-well pick. To remove an inter-well pick from a calculation without permanently deleting it, remove the check mark from the first column in the data table.
![]() Regrid
Data Points:Regrid
the data in the Edit Velocity Point window after making changes to the data table.
Regrid
Data Points:Regrid
the data in the Edit Velocity Point window after making changes to the data table.
![]() Load
Velocity Points:Load a text file that contains saved velocity information, including inter-well picks.
Load
Velocity Points:Load a text file that contains saved velocity information, including inter-well picks.
![]() Save
Velocity Points:Save the data in the table to a text file, including inter-well picks.
Save
Velocity Points:Save the data in the table to a text file, including inter-well picks.
![]() Reset: Retrieve the original location and velocity values. Any new data points will be removed, and any deleted data point will be restored.
Reset: Retrieve the original location and velocity values. Any new data points will be removed, and any deleted data point will be restored.
Add Inter-well Picks
The Add Inter-well Picks dialog box is used when creating an inter-well pick to select the name you want associated with the pick, and to specify the data value for the pick. When the fields in the dialog box are complete, click on the velocity grid in the window. This will add an entry to the data table, with a Data Source of "Inter-well" . To add multiple inter-well picks, change the depth or velocity value in the dialog box, and click again on the grid. Note: You can change the X, Y, and Velocity values in the data table after you add an inter-well pick.
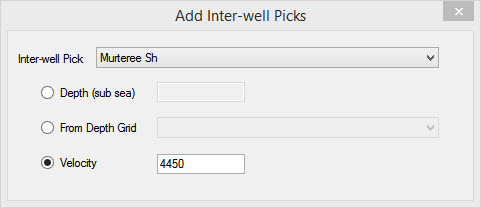
Inter-Well Pick: Select in inter-well pick formation name from the list. When you are calculating your depth grid using formation tops, this list will contain the names of all of the formations that appear in the Depth Options cell for the selected layer. When you are calculating your depth grid using velocity curves, this list will contain the names of all formation for which inter-well picks exist, or can be used to create a new inter-well pick formation. Note: If you entered an inter-well pick formation name on the Velocity Options tab in the Layer Details dialog box, you will not be able to enter a new inter-well pick formation name in this dialog box.
Depth (subsea): Enter a subsea depth value in the correct depth units, and then click on the preview grid to determine the X and Y values for the pick. An inter-well pick will be added to the data table, and the velocity calculated from the using the time grid for the layer.
From Depth Grid: Select a depth grid, and then click on the preview grid to determine the X and Y values for the pick. An inter-well pick will be added to the data table, and the velocity calculated using the time grid for the layer.
Velocity: Enter a velocity value in the correct velocity units, and then click on the preview grid to determine the X and Y values for the pick. An inter-well pick will be added to the data table, and the
Also See
— MORE INFORMATION

|
Copyright © 2020 | SeisWare International Inc. | All rights reserved |