Fault Import
The Fault Import dialog allows you to import text data representing fault segments.
-
Click
 to select the Input
Files.
to select the Input
Files. -
Specify the File Format.
-
When importing Columnar ASCII fault files, click
 and define the columns.
 -
(Optional) Set the Additional Parameters.
-
Set the options If Fault Already Exists.
-
Click
 to import the fault file.
General Information
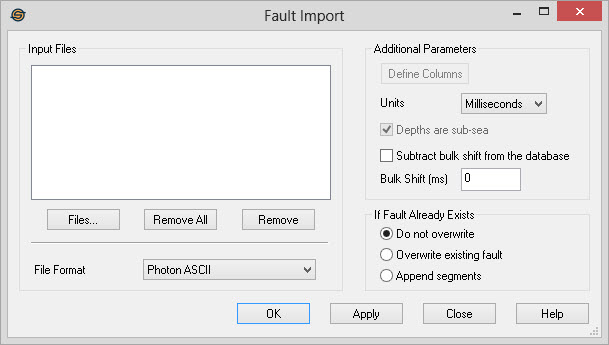
Input Files
Specify the files to import. You can import more than one file of the same format at a time.
Files...: Use to
select the files for import.
 Remove All:Remove
all of the files from the list of files to be
imported.
Remove All:Remove
all of the files from the list of files to be
imported.
 Remove:Remove
the selected files from the list of files to be
imported.
Remove:Remove
the selected files from the list of files to be
imported.
File Format
Specify
the type of file being imported.
- Photon ASCII: This is the format exported from SeisX.
- Columnar ASCII: This is generic columnar data ASCII data.
- Landmark Export (3D Only): This is the export from SeisWorks. The format of the file is the same as the Landmark Export (2D/3D) however use this option when importing into a single 3D survey to improve the speed of the import.
- Landmark Export (2D/3D): This is the export from SeisWorks. The format of the file is the same as the Landmark Export (3D Only) however use this option when importing into 2D lines or multiple 3D surveys. Because it is necessary to map the fault nodes to the individual 2D lines, this import will take significantly longer than the 3D Only import.
- Photon Stratigraphic Symbols: This is the stratigraphic symbol export from SeisX. Stratigraphic symbols can be imported as single node faults.
- GeoFrame ASCII
– This is the
export from GeoFrame and many other packages.
Additional Parameters
Specify additional parameters for the import.
Define Columns: Use this dialog to specify the format of
the file
when
importing columnar data. You need to define the Fault Name, X, Y
, Z, Line ID, and Segment
ID. For help with this step refer to the defining columns help
document.
Units: Select the units that the original fault data is in. Options are Milliseconds, Meters and Feet.
Depths are Subsea: Check this item when importing depth faults that were exported as subsea.
Subtract bulk
shift from the
database: Check this item to remove the static
shift that
has been applied to each line from the imported faults. Normally you
will leave this item unchecked, but some faults such as those
exported from Landmark and Kingdom already have the static shift
applied. Checking this item will remove the static shift so the
faults appear at the correct vertical location. The working set file
for a given
seismic line is the file that is used to determine the static
shift.
Bulk Shift: Add a static
shift to the imported
faults. Normally you will leave this as zero, but occasionally you
will receive data that has been exported with static shifts already
applied. This allows you to correct the z value of the faults on
import.
If Fault Already Exists
Specify the behavior fault already exists in the project that has the same name as a fault in the import file.
Do not overwrite: Selecting this option preserves the existing fault in the project.
Overwrite existing fault: Selecting this option will completely overwrite an existing fault.
Append
segments: Selecting this option will
not overwrite any
existing segments of a fault, just append the new segments in the file
to the existing fault.
— MORE INFORMATION

|
Copyright © 2020 | SeisWare International Inc. | All rights reserved |