Well Zone Data Importer
The Well Zone Data Importer is a new format for importing well zone information into your project in *.txt and *.csv format.
General Properties
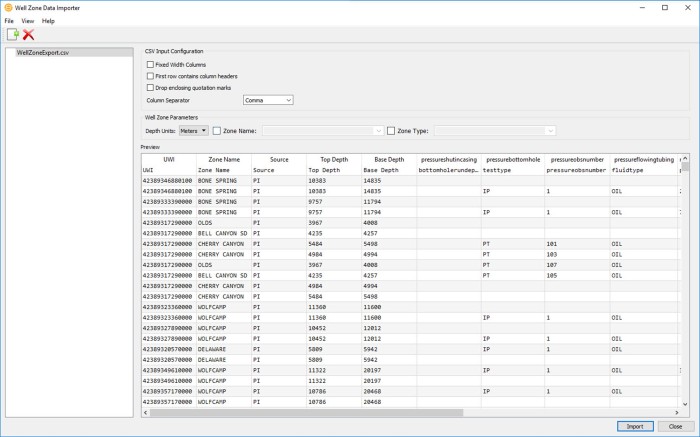
 How do I import well zone data information?
1. The file list, located on the left side of the dialog box, displays the list of files that you want to import. Drag and drop files into this area or click  to select your input files.
2. When you click on a file with the recognized format (*.csv and *.txt), you will see the data items within the file. Select the data items adjust their properties in the fields on the right side of the dialog box.
The Well Zone Data Importer will attempt to read the files based on their file extensions. If your file doesn't have one of these extensions you'll be required to manually select the format.
If you select multiple files, files with the same number of columns will automatically be grouped so that the CSV Input Configuration options and column headers only need to be defined once and will be applied to all files in the group. Move a file out of a group by right clicking on the file and select Upgroup. Move all files out of a group by right clicking on the group and select Ungroup.
3. Click  to import your files.
CSV Input Configuration Options
As you change the configuration options the data in the Preview window will change to reflect how the software will read the data.
Fixed Width Columns: The columns in the file are of a fixed width. If you open the file with a text editor the data in each column starts the same distance from the edge of the document. If the data is separated by a column separator, such as a comma, leave this unchecked.
First Row Contains Column Headers: The file contains column headers. When this is turned on the, any heading that is recognized by the software will be placed in the top row of the Preview window. If a heading isn't recognized it will display <Unknown> and you will need to click on the heading and select from a list of recognized data identifiers.
Drop Enclosing Quotation Marks: Remove quotation marks surrounding data.
Column Separator: Choose the separator that separates the columns in the file. This will be disabled if Fixed Width Columns is turned on.
Well Zone Parameters
Depth Units: Specify the units for your depths as they appear in the file.
Zone Name: Toggle this on and enter a Zone Name or select an existing Zone Name from the dropdown if there is no Zone Name column defined.
Zone Type: Toggle this on and enter the Zone Type or select an existing Zone Type from the dropdown if there is no Zone Type column defined.
Preview
The preview window displays the data as it will be read by the software. Every column that you want to import should have a column heading with the data appearing below. When the data looks correct, click .
Column Header Options
Click on the column header box to select the header name.
UWI:Select this header for the column containing the UWI information. This column is required for import.
Zone Name: Select this header for the column containing the zone name. If this column does not exist, the zone name will need to be defined in the Well Zone Parameters portion of the import.
Zone Type: Select this header for the column containing the zone type. If this column does not exist, the zone type will need to be defined in the Well Zone Parameters portion of the import.
Source: Select this header for the column containing the source information.
Top Depth: Select this header for the column containing the top depth of the zone. This column is required for import unless a discrete depth or sample length is defined.
Base Depth: Select this header for the column containing the base depth of the zone. This column is required for import unless a discrete depth or sample length is defined.
Discrete Depth: Select this header for the column containing the discrete depth. Use this column if the base depth is the same as the top depth. If using discrete depth do not define the top depth and base depth columns.
Sample Length: Select this header for the column containing the sample length. If this column is defined you do not need to defined both the top and base depth columns, you will only need to define one.
Menu
The menus at the top of the window contain tools to add, delete, and view files, access help information, and close the dialog.
Toolbar
The Edit Toolbar allows you to quickly add and delete files from import.
Edit Toolbar

Add File: Select files to bring into the importer.
 Remove File: Removes the selected file from the importer.
— MORE INFORMATION

|
Copyright © 2020 | SeisWare International Inc. | All rights reserved |