Seismic Viewer: Picking Horizons
To pick horizons, first open the Pick Horizons dialog box in one of the following ways:
- From the Horizon menu on the Main Launcher, select Pick.
- From the Horizon
menu in the Seismic Viewer, select Pick .
- In the Seismic Viewer, on the Seismic
Toolbar, click the Pick Horizon icon (
 ).
). - Use the keyboard shortcut H while the Seismic Viewer is the active window.
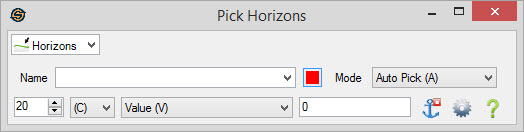
The Pick dialog box is used for picking horizons and faults. If the picking dialog is already open, select Horizons from the Pick Type menu. The dialog can be docked to the top or bottom of your desktop by opening the Pick Configuration dialog, and selecting your docking location.
Note: While the picking dialog is open, some functionality will be inaccessible from the Seismic Viewer. To access all of the tools, select <Pick Type> from the Pick menu to inactivate picking, or close the Pick dialog box.
 How do I pick a horizon?
-
Click on the Pick Horizon icon
, from the Horizon menu select Pick Horizons, or
use the hot key H
to
launch the Pick Horizons dialog box . -
Specify the name of the horizon to be picked. For an existing horizon, select from the Name list. For a new horizon, type a name into the Name field.
-
Select a Pick Mode.
-
Define additional picking properties.
-
Pick the horizon using left mouse button clicks, or using a combination of left and right mouse button clicks, as determined by the pick mode.
-
Close the Pick Horizons dialog box, or change the Pick selection to <Pick Type>.
How do I erase a horizon pick?
-
Hold down the Shift key on your keyboard.
-
Pick as you would with the current pick mode. The picks will be erased in the same manner as they were drawn. For example, if you were picking in snap stream mode you would erase by holding down the shift key, then clicking and holding the left mouse button down and dragging it across the seismic display. The picks between the original point you depressed the mouse and the current position will be erased.
How do I abort a horizon pick?
-
If you are in the middle of either guide or straight line mode you can cancel the operation before completing the pick by hitting the Esc key. This is most useful when you have accidentally selected the wrong starting point.
How do I undo a horizon pick?
-
Select Undo from the Edit menu of the Seismic Viewer or use the keyboard shortcut combination Ctrl+Z. The Seismic Viewer only maintains information for the last pick so only a single undo operation can be performed.
General Information
Pick Type Selector
Pick: Indicates if you are picking faults, horizons, or not currently picking. When you open the Pick Horizons dialog box using one of the methods above, this will read Horizons It can be changed to Faults to pick faults, or <Pick Type> to stop picking.
Horizon Properties
Name: Enter the name of a new horizon, or select the name of an existing horizon. When you use the hot key H to open the Pick Horizons dialog box, the name of the horizon closest to your cursor will appear in this field.
Color: Choose the color of the horizon. While you are picking the horizon is drawn in the Active Horizon Color, and not the color you select.
Mode: This determines how
the
mouse
reacts to user input when picking horizons. Select a mode from the list, or use the keyboard shortcut.
Auto Pick (A): Automatically pick to the left and the right of the cursor using the Search Window, Search Mode, and Event Type constraints.
Snap Stream (S): Automatically pick by dragging your cursor over an event using the Search Window, Search Mode, and Event Type constraints.
Guide (G): Automatically pick over a range of data selected using your cursor using the Search Window, Search Mode, and Event Type constraints .
Manual (M): Place a pick exactly on your cursor location. This is not constrained by Event Type.
Straight Line (I): Draw a straight line on your seismic data.
Datum (D): Create a datum reference line to the left and right of the cursor.
Search Window: Specify a time window in milliseconds used to constrain the picking operation when using Auto Pick, Snap Stream, and Guide modes. This value is applied above and below the current pick, making the total search window twice the value that appears in this field.
Search Mode: When picking using Auto Pick, Snap Stream, and Guide modes, specify whether you want to find the Closest or Largest event within the Search Window. This is only relevant for Peak and Trough event types.
Event Type:
Specify the
type of event to pick when using Auto Pick, Snap Stream, and Guide modes.
Select an event type from the list, or use the keyboard shortcut.
Peak (P): Using the Search Mode and Search Window constraints, place the pick on a peak.
Trough (T): Using the Search Mode and Search Window constraints, place the pick on a trough.
Zero Crossing (Z): Using the Search Window constraint, place the pick on a peak/trough zero crossing, or trough/peak zero crossing.
Peak/Trough Zero Crossing (+): Using the Search Window constraint, place the pick on a peak/trough zero crossing.
Trough/Peak Zero Crossing (-): Using the Search Window constraint, place the pick on a trough/peak zero crossing.
Value (E): Using the Search Window constraint, place the pick only when the amplitude matches the value entered in the Value field. If an exact value isn't found, an interpolated value will be used, as long as it falls within the Search Window. Note: This is only valid when you are in Auto Pick mode.
Value:
When you are picking on a Value,
enter the value in this field. If this exact value isn't found within the Search Window, an
interpolated value will be used.
Docking
 Dock Dialog:
Dock the dialog to the bottom or top of your main window, as specified
in the Pick Configuration dialog
Dock Dialog:
Dock the dialog to the bottom or top of your main window, as specified
in the Pick Configuration dialog
Picking Configuration
 Configuration:
Open the Pick Configuration dialog
to set your docking preference.
Configuration:
Open the Pick Configuration dialog
to set your docking preference.
Also See
— MORE INFORMATION

|
Copyright © 2020 | SeisWare International Inc. | All rights reserved |