Pad Plan 2D: Data Importer
Use the Data Importer to add data to a project when using a standalone version of Field Development Tool. This tool can be used to import well, culture, grid, and raster information that is stored in an allowable format. After importing data, use the Data Selection dialog box to add data to your scene.
 Before you import any data, make sure that you have defined the coordinate system of your project and that the data is referenced to the same coordinate system.
Note: If you are using Field Development Tool with Geology or Geophysics, this window will not be available. Please use the tools found on the Main Launcher.
File List
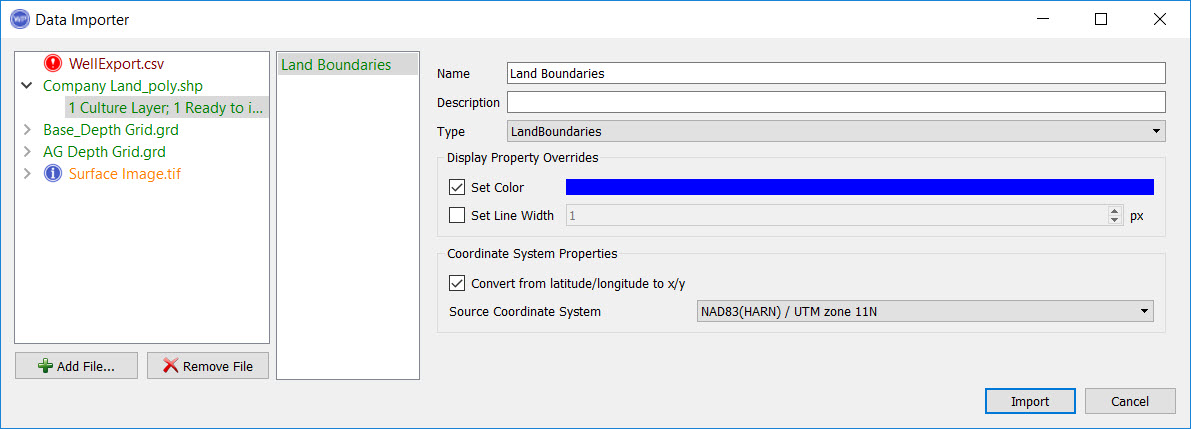
The file list, located on the left side of the dialog box, displays the list of files that you want to import. Drag and drop files into this area, or click  and select the files from their folder locations. The files are colored depending to indicate whether the file type has been recognized and the minimum data requirements have been met.
| Green | These files can be imported. The file type is recognized and the minimum data requirements have been met. Expand the data file and click on the data item to add additional information or edit its properties. |

|
| Orange | The file type is recognized but the minimum data requirements have not been met. Expand the data file and click on the data item to complete the information. |

|
| Red | The file type is not recognized. Click on the file name to select the correct format. If the format is not aligned with the data in the file, the name will remain red. |

|
When you click on a file you will see the file format options for the file in the center of the dialog box. When the format is recognized you can click to expand the display and show the data items within the file. Select the data items adjust their properties in the fields on the right side of the dialog box.
The Data Importer will attempt to read the files based on their file extensions. If your file doesn't have one of these extensions you'll be required to manually select the format.
Allowable File Formats and Minimum Data Requirements
| Data Type | File Type | Minimum Data Requirement |
| Culture | Shapefile (*.shp) | Data in this format will contain the necessary information. |
| Grids |
Surfer (.grd, *.srf) or Landmark Zmap (*.dat) |
Data in these formats will contain the necessary information. |
| Wells - General Well Information | Columnar ASCII (*.csv, *.txt) | UWI, Location. |
| Wells - Directional Survey | Columnar ASCII (*.csv, *.txt) |
One of the following:
|
| Raster | Image Files (*.tif, *.jpg, *.gif, *.png, *.bmp) | If using a *.tif file it will look for a *.tfw file. If one is not found then you will need to define the corner points manually. |
Data Format Options
Format: For files that don't have a recognized format, select file from the file list and then select the correct format and file type.
CSV Input Configuration: When importing columnar ASCII files, adjust the configuration options so that the data in the columns is being read correctly and the columns are labeled with headings that will be recognized by the software. ![]() See CSV input configuration options...
See CSV input configuration options...
 .
. Import Data Properties
When the data files are recognized you can select a data item to inspect the parameters and in some cases edit and add information such as the name and description. The options are different for each data type.
Import Culture: Select the data items in the culture layer to view and modify its properties. Once imported, you can add culture layers to your scene on from the Data Selection dialog box and view, copy, paste and delete them from the Culture Properties window. ![]() See culture import properties...
See culture import properties...
Import Grid: Select the data items in the grid layer to view and modify its properties. Once imported, you can add grids to your scene on from the Data Selection dialog box and view, copy, paste and delete them from the Grid Properties window. ![]() See grid import properties...
See grid import properties...
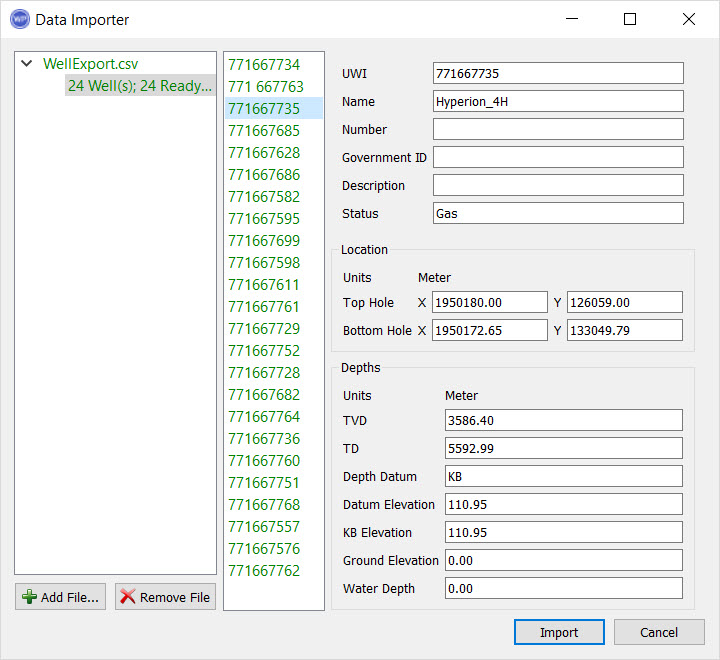
Import General Well Information: Once the CSV file has been configured, click on the data items and then select a well from the list displayed in the middle of the window to view its properties, and edit the information in some fields. Once imported, you can add wells to your scene on from the Data Selection dialog box and view, copy, paste and delete them from the Well Properties window. ![]() See general well information import options...
See general well information import options...
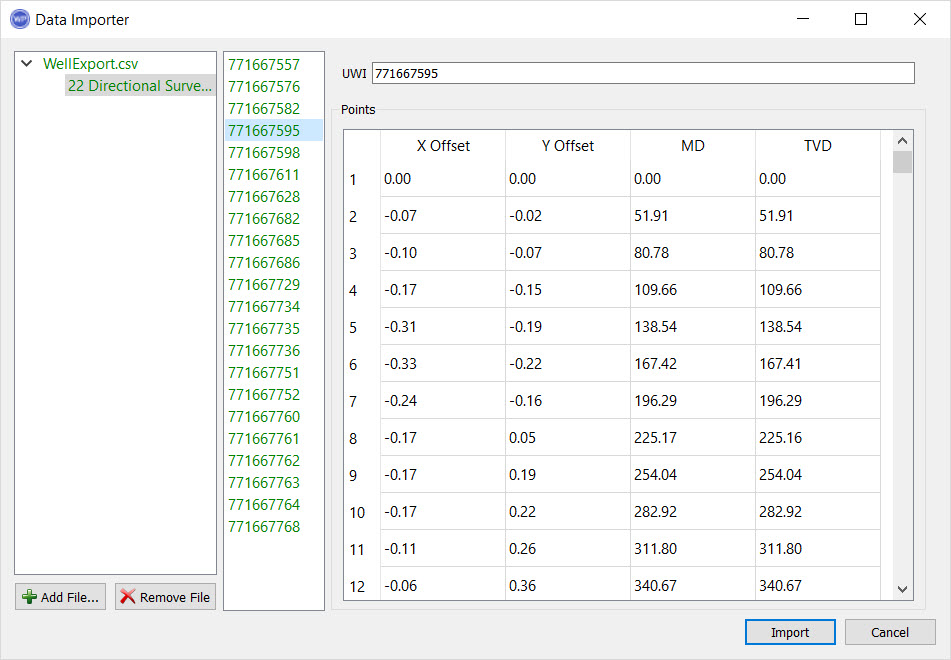
Import Directional Survey: Once the CSV file has been configured, select a well from the list to view its properties. Once imported, you can view from the Well Properties window. ![]() See directional survey import options...
See directional survey import options...
Note:If using Measured Depth, Azimuth, and Inclination for a directional survey import, turning on Layer Sampling will produce more accurate results for legs that have been edited. Legs that have not been edited do not require Layer Sampling to be turned on, and will import accurately.
Import Raster: Select the data items in the raster layer to view and modify its properties. Once imported, you can add raster images to your scene on from the Data Selection dialog box and view, copy, paste and delete them from the Raster Properties window. ![]() See raster import options...
See raster import options...
— MORE INFORMATION

|
Copyright © 2020 | SeisWare International Inc. | All rights reserved |