Export Locations
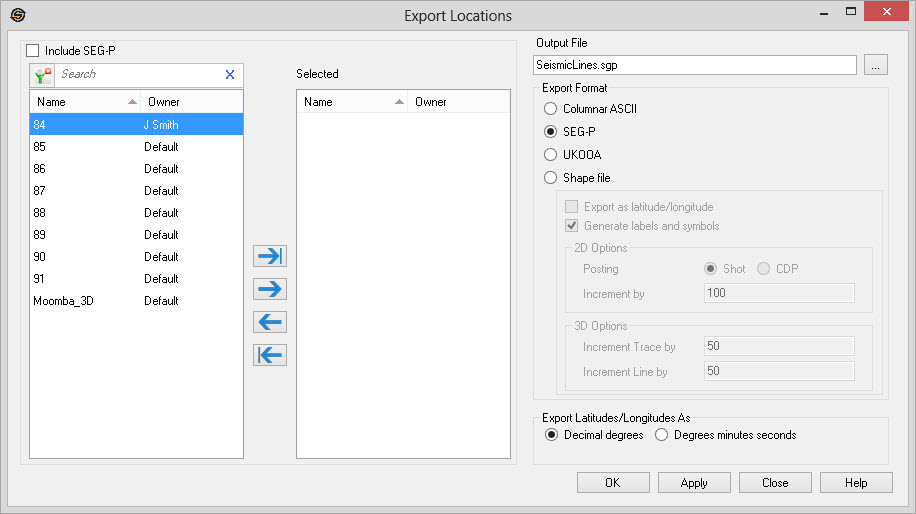
The Export Locations dialog allows you to export the trace locations (northings and eastings) for the selected files. If a coordinate system has been defined for the project, latitudes and longitudes may also be exported.
-
Select the lines for export from and move them to the Selected list.
-
Specify the Output File name. By default it is saved in the Project folder. Change the output location by clicking
 .
. -
Set the Export Format.
-
(Optional) Set the data to Export as Latitude/Longitude instead of in XY coordinates.
-
(Optional) Set the options for generating symbols and labels.
-
Click
 to generate
the file.
to generate
the file.
General Information
Seismic Files List
Select the seismic files that you want included in the export file. Left click to select a seismic line, or use the Ctrl key on your keyboard to select multiple seismic lines, and then use the selection arrows to move the lines to the Selected list. Alternately, you can move a single line to the Selected list by double clicking on it, and move a group of lines by selecting them from the Basemap.
To help you make your seismic file selections, you can sort any column
by left clicking
on the column header, you can apply a filter (![]() ), or you can type a search string
into the search
bar to limit the list using
Name,
and Owner information.
), or you can type a search string
into the search
bar to limit the list using
Name,
and Owner information.
For additional selection and navigation options right click on the seismic files list to access the shortcut menu.
Include SEG-P: Turn
this on to include SEG-P lines in the Available
list.
Output File
File Name: Specify a name for the
output file. You can select an existing file to overwrite by
clicking
Export Format
Specify the format of the output file.
Columnar ASCII: Export the coordinates as a tab separated ASCII text file.
SEG-P: Export the
coordinates in SEG-P format.
UKOOA: Export
the coordinates in a UKOOA format.
Shape File: Export the coordinates in a ESRI Shapefile format. This is useful when wanting to display seismic lines in other mapping packages.
2D Options
Post: When exporting 2D seismic lines, post either the CDPs or the shot points.
Increment By: When exporting 2D seismic lines, the increment to use to generate the labels. If posting CDPs, the increment is the CDP increment to use. If posting shot points, the increment is the shot point increment to use.
3D
Options
Increment by
Trace: When exporting 3D seismic lines,
the increment to
use to label in the cross line direction.
Increment by
Line: When exporting 3D seismic lines,
the increment to
use to label in the in-line direction.
Export Latitudes and Longitudes as
Specify how to export the latitudes and longitudes when exporting to SEG-P. Latitudes and longitudes are only exported if a project coordinate system has been defined. When exporting to columnar ASCII or to an ESRI Shape file latitudes and longitudes are always written as decimal degrees.
Decimal degrees: Export as degrees and fractional degrees
following the decimal place.
Degrees minutes seconds: Export as degrees, minutes and seconds with a character (N,S,E,W) representing the direction.
— MORE INFORMATION

|
Copyright © 2020 | SeisWare International Inc. | All rights reserved |