Field Development Tool: Stamping Tool
The Well Pad Stamping Tool is used to place well pads into your scene using the specified parameters.
Base Name: Enter a base name for the stamped well pad. When you stamp a pad this name will be applied to the pad as it appears in the Target Folder with a consecutive number appended to the name, for example "WellPad_1". 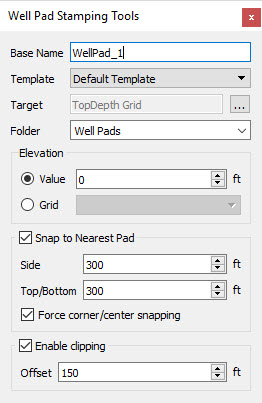
Template: Select a template from the list. You can create or edit a template from the Template Builder window. If you don't have a template you will see a warning icon displayed next to this field.
Target: The target associated with the specified Template.
Folder: Select a scene tree folder in which to place the well pads or enter a new folder name. When you enter a new name the folder will be added to the scene tree and the stamped pad placed within in.
Elevation: Enter an elevation above ground level or select a grid at which to place the pad.
Snap to Nearest Pad: Turn this on to control the distance between stamped pads, and then enter a Lateral and Toe to Toe distance.
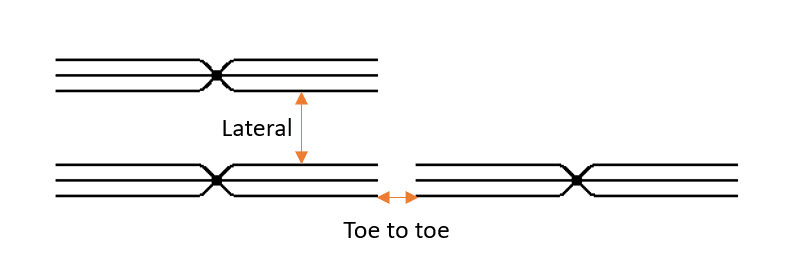
Force Corner/Center Snapping: Use the Lateral and Toe to Toe restrictions when stamping pads. When this is turned off you are able to use either the Lateral and Toe to Toe restriction. Note: This option only works when two pads have the same azimuth.
Enable Clipping: Clip the well bores using the polygon specified in the Target Properties dialog box. You can enable clipping after stamping a well from the Object Properties dialog box.
Offset: Enter the distance from the edge of the bounding culture at which to clip the well bores.

|
WellPad_1 has clipping enabled with an offset distance greater than 0. |
|
WellPad_2 has clipping enabled with an offset distance of 0. |
|
| WellPad_3 has no clipping enabled. |
— MORE INFORMATION

|
Copyright © 2020 | SeisWare International Inc. | All rights reserved |