Automatic Mistie Analysis:
Single View
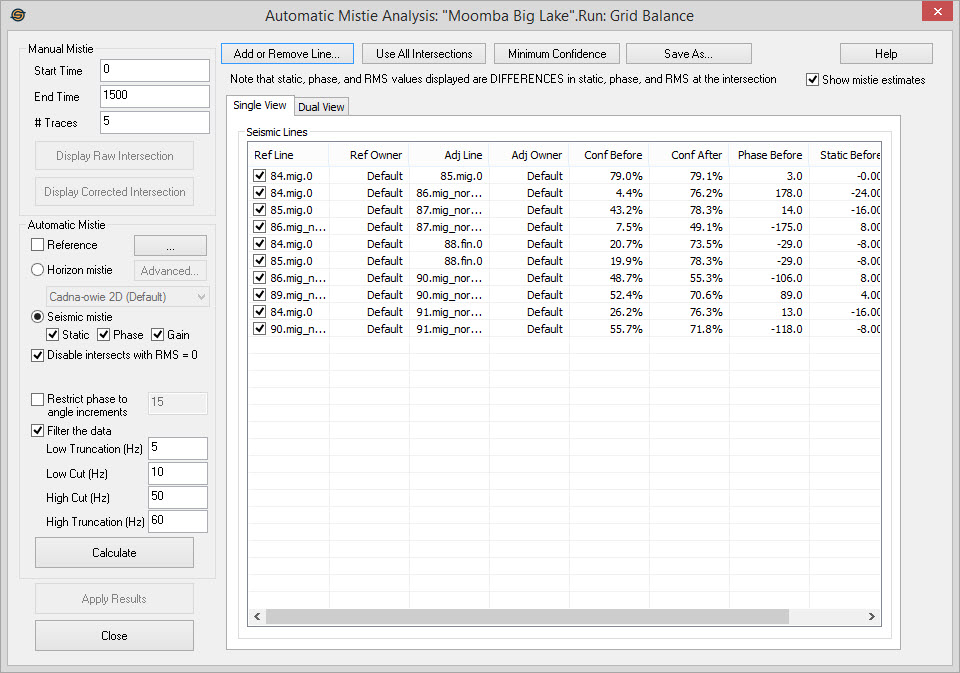
Single View is the default view when opening Automatic Mistie Analysis. It will be blank when you are creating a new run, or contain your list of lines if you are using an existing run, or have already selected your lines. Before a calculation is run is will show the current static, phase and gain differences between the selected lines. Once a calculation has been run, the table will show both the before and after values. It may be easier to understand the before and after values by switching to Dual View.
All of the columns in the single view
table can be sorted by left
clicking on the titles or resorted by dragging on dropping them. If you
select an intersection you will see that intersection highlighted on
the map. Once an intersection is selected you can also see the seismic
lines before and after the mistie correction using the Manual Mistie display
options. To remove an intersection from the calculation you can
turn of the check mark in the first column.
Manual Mistie
Start Time:Specify the start time in milliseconds (ms) to define the window used for the mistie analysis.
End Time: Specify the end time (ms) for the window of data to use for mistie analysis.
# Traces:The
number of traces on either side of the intersection that will be used
in the mistie analysis.
 Display Raw Intersection:Select
an intersection for this to be
enabled. It will launch a manual mistie display that shows the
intersection
without any of the adjustments applied.
Display Raw Intersection:Select
an intersection for this to be
enabled. It will launch a manual mistie display that shows the
intersection
without any of the adjustments applied.
 Display Corrected
Intersection:Only available after you have run
"Calculate". You
must also select an intersection for this to be
enabled. A manual mistie display will launch, showing the
intersection
with the adjustments applied.
Display Corrected
Intersection:Only available after you have run
"Calculate". You
must also select an intersection for this to be
enabled. A manual mistie display will launch, showing the
intersection
with the adjustments applied.
Line and Intersection Options
 Add
or Remove Line:Click
to bring up the dialog used to select
the lines you want to use in the calculation. Lines can be
selected from the list, or can
be selected by dragging out an area on the Basemap.
Add
or Remove Line:Click
to bring up the dialog used to select
the lines you want to use in the calculation. Lines can be
selected from the list, or can
be selected by dragging out an area on the Basemap.
 Use all Intersections:If
intersections have been turned off you can select this option to
reselect all intersections.
Use all Intersections:If
intersections have been turned off you can select this option to
reselect all intersections.
 Minimum Confidence:Typically
intersections that have an after confidence below a certain value
should not be used in the calculation. Use this option to
specify
a confidence level. Anything below that level will be
unselected
and not used in the calculation.
Minimum Confidence:Typically
intersections that have an after confidence below a certain value
should not be used in the calculation. Use this option to
specify
a confidence level. Anything below that level will be
unselected
and not used in the calculation.
 Save As... :Saves
an Excel or text file of the view you are looking at. Note: You
cannot reload values from this file back into the Automatic Mistie Analysis.
Save As... :Saves
an Excel or text file of the view you are looking at. Note: You
cannot reload values from this file back into the Automatic Mistie Analysis.
Show Mistie Estimates:If this box is checked on, then the single and dual view will always update to show the estimated mistie errors. If unchecked, then the values will NOT update. Thus, while you might see mistie error values, these values will reflect the last time run, or the last values estimated when this was checked on.
Automatic
Mistie
Reference:Select
one or more lines to use as the reference lines. Reference lines
are not affected by mistie analysis so other lines intersecting it will
have any changes applied to them, and the reference line will remain
unchanged. Typically a 3D survey or a well
synthetic is used as references.
Horizon Mistie
Turn this on if you would like to use horizons and not seismic data as input to the mistie analysis. Using horizons will result in only bulk shifts being applied. Unlike seismic mistie, horizon mistie can result in mistie errors being completely removed if you wish.
 Advanced...
: Open
thee Advanced
Mistie Settings
for horizon misties.
Advanced...
: Open
thee Advanced
Mistie Settings
for horizon misties.
Horizon Selection: Select the horizon you wish to use as input for mistie analysis on a horizon.
Disable
intersects with
RMS
= 0:
Automatically eliminate intersections in which there
is no data. This can often occur at the ends of lines or just in
regions where there gaps in the seismic
data.
Seismic Mistie
Turn this on you would like to adjust the phase, static, and gain (RMS) of seismic data. Once selected you can chose to mistie the data based on any combination of the three check boxes:
Static:Check this to adjust the static of each line.
Phase: Check to adjust the phase of each line.
Gain:Check to adjust the gain (RMS) of each line.
Disable intersects with RMS = 0: Checking this feature on is useful to automatically eliminate intersections in which there is no data. This can often occur at the ends of lines or just in regions where there gaps in the seismic data.
Restrict Phase to Angle Increments:Sometimes it makes no sense to do half degree rotations. This feature can allow adjustments to be to the nearest X degrees. Thus, if a resulting adjustment of four is to be applied and this restriction is set to 10, then zero degrees will be applied. Of course, if an adjustment of six is required, then ten will be applied.
Filter The Data:
When turned on, this will
apply the
filter to the data prior to computing the mistie solution. This will
not affect the data processed, but instead allow you to ensure data
frequencies are common when computing mistie solutions.
Low Truncation (Hz):All frequencies below this value are removed. Frequencies between this and the Low Cut frequency are smoothly ramped up using a cosine taper.
Low Cut (Hz): Frequencies between the Low Truncation and this frequency are smoothly ramped up using a cosine taper. Frequencies between this and the High Cut Frequency are left unchanged.
High Cut (Hz): Frequencies between the Low Cut and this frequency are left unchanged. Frequencies between this and the High Truncation Frequency are smoothly ramped down using a cosine taper.
High Truncation (Hz): Frequencies
above this
value are removed. Frequencies between the High Cut and this
frequency are smoothly ramped down using a cosine taper.
Calculate
 Calculate: Compute
the least squares solution to
the
misties.
After calculating the results, you will then be able to click to check the results before actually applying
them. The single and dual views of the intersects will also show before
and after corrections.
Calculate: Compute
the least squares solution to
the
misties.
After calculating the results, you will then be able to click to check the results before actually applying
them. The single and dual views of the intersects will also show before
and after corrections.
Apply Results
 Apply Results:
Process the seismic
data or adjust the
horizons. The
results computed by clicking will then be applied to all line
versions. Static changes are updated in the database, and phase and
gain changes are processed into a new version of the line. Old
bulk shifts are overwritten and a warning pops up before the dialog
takes you to the batch processing screen. On the batch processing
dialog, enter a version number and description
and click
Apply Results:
Process the seismic
data or adjust the
horizons. The
results computed by clicking will then be applied to all line
versions. Static changes are updated in the database, and phase and
gain changes are processed into a new version of the line. Old
bulk shifts are overwritten and a warning pops up before the dialog
takes you to the batch processing screen. On the batch processing
dialog, enter a version number and description
and click . The new lines will by default become your working
set version that you can use from then on.
. The new lines will by default become your working
set version that you can use from then on.
Automatic Mistie Options
— MORE INFORMATION

|
Copyright © 2020 | SeisWare International Inc. | All rights reserved |