Creating Custom Well Symbols
If you need additional well symbols you will need to add both an .emf and .svg version of the file to the project.
- Create a well symbol using a software package that can save .emf and .svg files. If your software can only create one type of symbol, create the file and then use an online resource to save the file in a different format. Note: Be sure to draw the symbol in the .emf file upside down - due to mapping modes this is a requirement. In this example the files will be saved as:
NewStatus.emf
NewStatus.svg
- Place the well symbols into folder called Support\Wells
which is located in the SeisWare installation directory. This support
directory location can be found in the Project Configuration dialog box.
- In the Support\Wells folder you will find a file called
WellIds.xml. Edit this file to add the *.svg file with an appropriate ID,
filename and status name.
Look at the other
lines in the file to ensure that the ID is unique.
This is an .xml file and needs to conform to .xml standards. View the .xml
file in an XML or HTML editor, or view using a browser to make sure
that there are no syntax errors. The lines added should look
something like
the following:
<WellSymbol>
<Code>050</Code>
<Name>New Status</Name>
<FileName>NewStatus.svg</FileName></WellSymbol>
- In the Support\Wells folder you will find a file called
WellIdsOld.xml. Edit this file to add the *.emf file with an appropriate ID,
filename and status name.
Look at the other
lines in the file to ensure that the ID is unique.
This is an .xml file and needs to conform to .xml standards. View the .xml
file in an XML or HTML editor, or view using a browser to make sure
that there are no syntax errors. The lines added should look
something like
the following:
<WellSymbol>
<Code>050</Code>
<Name>New Status</Name>
<FileName>NewStatus.emf</FileName></WellSymbol>
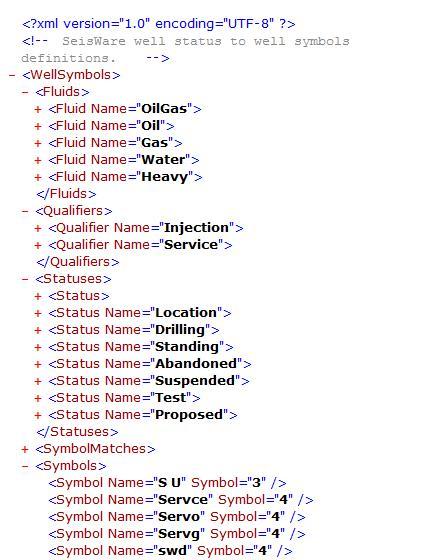
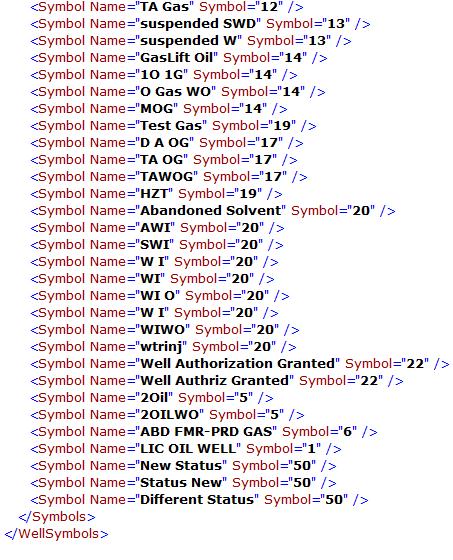
- To have the correct symbol appear when you import a well you must also edit the file WellSymbols.xml in the same folder. This is also an .xml file and needs to conform to .xml standards. There are a number of ways that it could be added, but the easiest is to go down to the "Symbols" section and add a line such as the following:
<Symbol Name="New Status"
Symbol="50"/>
This will cause any well symbol with the text status "New
Status" to have a well status ID of 50. This then maps to the
*.emf
or *.svg that has an ID of 50. Place as many text status entries as you wish, as per the example below.
WARNING: Changes to these
files are likely to
be lost when upgrading SeisWare or installing patches. Be sure to keep
notes about the changes you’ve made and check to reapply them
after applying patches or upgrades.
— MORE INFORMATION

|
Copyright © 2020 | SeisWare International Inc. | All rights reserved |