Time/Depth Velocity Modeling: Layers
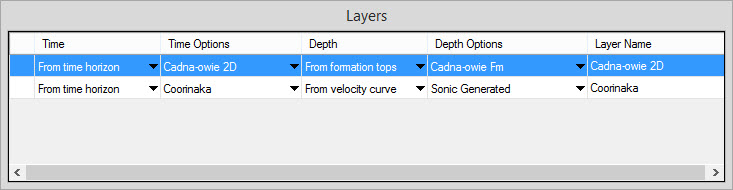
The Layers dialog box is used to specify the method to use to obtain input data, select the input data, and name the output grids. The options available in this dialog box will be different if you are performing a time to depth conversion, or a depth to time conversion.
When you start a new calculation, there will be one row available in the Layers dialog box. Click the arrow in each cell, and select from the available options. Use the tools on the Standard Toolbar, or the shortcut menu to add new layers, copy existing layers, re-order layers, and delete layers from your calculation. As you add or remove layers, you may see errors and warnings when the information is incomplete or out of date.
If there are multiple layers in the dialog box, the information displayed in all of the dialog boxes corresponds to the selected layer. The Layers dialog box can't be turned off, but it can be minimized and moved to help you access the display and analysis tools available in the other dialog boxes.
Time to Depth Conversions
The following options are available when you select Convert Time to Depth on
the Standard Toolbar.
Note: Before you start,
select your data and specify default gridding and contour options in
the Properties dialog box. As
you build your layer, be aware that there are additional options
available in the Layer Details dialog
box that may affect your results.
Time and Time Options
The items available in the Time Options list will change, depending on the Time selection. There are additional options available in the Layer Details dialog box that may affect the final grid.
Time |
Time Description |
Time Options |
| From time horizon | Create the time surface to be used in the time to depth calculation from an existing horizon or horizons. Override the default gridding behavior form the Gridding/Contour Options tab in the Layer Details dialog box. | Select one or more horizons from the list. Specify the behavior when multiple horizons exist from the Advanced Options tab in the Layer Details dialog box. |
| From time grid | Use an existing time grid in the time to depth calculation. | Select an existing time grid from the list. |
Depth and
Depth Options
The items available in the Depth Options list will change, depending on the Depth selection. There are additional options available in the Layer Details dialog box that will may affect your results.
Depth |
Depth Description |
Depth Options |
| From formation tops | Use formation tops to generate velocity points from which to create a velocity grid. | Select
one or more formation tops from the list. Specify the behavior
when multiple tops exist from the Advanced Options tab
in the Layer Details dialog
box. If you are using the order of the tops to determine
which top to use when multiple tops exist, use |
| From velocity curve | Use time/depth pairs from tied velocity curves to generate velocity points from which to build a velocity grid. | Select on or more velocity curve names from the list. |
| From velocity grid | Use a velocity grid that exists in your project. | Select an existing velocity grid from the list of available grids. |
| From Depth grid | Use a depth grid that exists in your project. This is useful when you are creating multiple layers, but have already generated a depth grid for one of the layers, or if you are using multiple layers to create a velocity model. |
Select an existing depth grid from the list of available grids. From the Grid Values options, select the depth reference, and then for grids containing TVD values, specify the Depth Reference parameters.
|
| From constant function | Assume a constant velocity over the entire area to generate the depth output. | Enter
a constant velocity, or create a linear, quadratic, or cubic function. 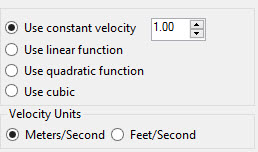 |
| From stacking velocities | Create a velocity grid from a stacking velocities file in columnar ASCII format. | Select
a stacking velocities file and click  . Define the
columns forCDP, X, Y, Time and Velocity,
and then click . Define the
columns forCDP, X, Y, Time and Velocity,
and then click  . . |

Depth to Time Conversions
The following options are available when you select Convert Depth to Time on the Standard Toolbar. Note: Before you start, select your data and specify default gridding and contour options in the Properties dialog box. As you build your layer, be aware that there are additional options available in the Layer Details dialog box that may affect your results.
Velocity and Velocity Options
When performing a depth to time conversion, the velocity grid is created from velocity curves. There are additional options available in theLayer Details dialog box that may affect your results.
Velocity Definition |
Velocity Definition Description |
Velocity Options |
| From velocity curves | Use velocity curves to create the velocity grid used to convert the depth grid to time. | Select on or more velocity curve names from the list. |
Depth Definition and Depth Options
The items available in the Depth Options list will change, depending on the Depth selection. There are additional options available in the Layer Details dialog box that may affect your results.
Depth Definition |
Depth Definition Description |
Depth Options |
| From formation tops | Use formation tops to generate a depth grid. | Select one or more formation tops from the list. Specify the behavior when multiple tops exist from the Advanced Options tab in the Layer Details dialog box. |
| From depth grid | Use an existing depth grid. | Select an existing depth grid from the list of available grids. From the Grid Values options, select the depth reference. |
Errors and Warnings
The first column in the Layers dialog box is used to display warnings. If this field is blank, then there are no errors in your layer, and the calculation is current.
![]() Warning: This symbol appears when
there have been changes to the layer, and the calculation needs to be
rerun. Click the Run
Layer icon (
Warning: This symbol appears when
there have been changes to the layer, and the calculation needs to be
rerun. Click the Run
Layer icon (![]() )
to
rerun the calculation for the selected layer, or click
)
to
rerun the calculation for the selected layer, or click  to run the
calculation for all layers.
to run the
calculation for all layers.
![]() Error:
This symbol appears when there is information missing from the layer
definition. Hover your cursor over the symbol for more details about
the missing information.
Error:
This symbol appears when there is information missing from the layer
definition. Hover your cursor over the symbol for more details about
the missing information.
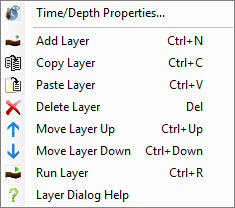
Shortcut Menu
Right click on the Layers dialog box to access the tools on the shortcut menu. These tools are also available on the StandardToolbar, and Properties Toolbar.
Also See
— MORE INFORMATION

|
Copyright © 2020 | SeisWare International Inc. | All rights reserved |