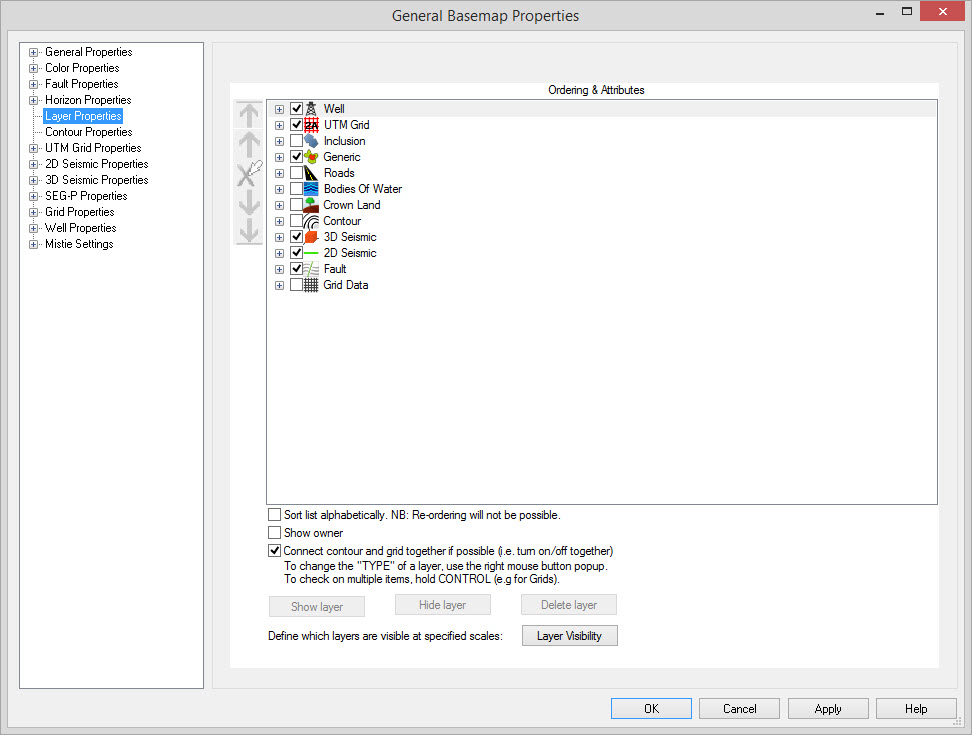
Layer Properties
The Layer Properties control what layers are visible and the order in which they are drawn on the map. To quickly open this dialog, just right click anywhere in the map area, and the select Layer Properties.
Click in the box next to the name of the layer to place or remove the check mark. You can click the "+" next to a layer group to expand the group to find individual layers.
Layers can reordered within the layer group, and layer types can be reordered.
-
Click on the layer or layer type.
-
While holding down the mouse button, drag the layer to a new location in the list.
-
Right click on a layer and select Set Layer Type.
-
Choose a layer type from those listed.
-
Re-launch the Layer Properties to see the changes reflected.
Ordering and Attributes List
Layers are grouped according to type and you can reorder the layer groups. The topmost layer is drawn on the top and the layers are drawn in the order selected. Within each group, individual items will be listed so individual layers can be turned on, off or reordered within the group (the exception being 2D Seismic).Show Owner: When enabled, the owner of the data is displayed in brackets next to the data. This only applies to individual data items. For example the generic item Wells will not have any owner information, however an individual grid will.
Connect contour and grid if possible: When enabled, this will cause the grids and contours to be connected. That is, if the grid is turned on or off, the corresponding contour is also turned on or off, and vice versa. If you want to display a time contour with an amplitude grid, be sure to disable this option. Note that the names of the grid and horizon must be consistent. Grids and contours are considered "connected" if the base name is the same. The base name is the grid name without the "Grid" extension, and the contour name without the "Contour" extension.
 Show
Layer: Use
this button to
toggle
a layer on. A layer is
shown (visible) when the box to the right is checked on. This is the
same function as turning on a check box. Note:
Some
layer types (Contours, Grid Data, and Raster) will only allow one to be display at a time.
To override this, hold down the Ctrl key and check on multiple layers.
Show
Layer: Use
this button to
toggle
a layer on. A layer is
shown (visible) when the box to the right is checked on. This is the
same function as turning on a check box. Note:
Some
layer types (Contours, Grid Data, and Raster) will only allow one to be display at a time.
To override this, hold down the Ctrl key and check on multiple layers.
 Hide
Layer: Use
the button to toggle a
layer
off. A layer is off (not
visible) when the check box is empty. This is the same function as
turning off the check box.
Hide
Layer: Use
the button to toggle a
layer
off. A layer is off (not
visible) when the check box is empty. This is the same function as
turning off the check box. Delete Layer:
To
delete a layer, highlight the layer first and then select Delete layer
or use the icon. Note:
This is NOT
reversible.
Delete Layer:
To
delete a layer, highlight the layer first and then select Delete layer
or use the icon. Note:
This is NOT
reversible. Layer Visibility: Open
the Layer
Visibilitywindow to define the
scale at which the data is turned
off and on.
Layer Visibility: Open
the Layer
Visibilitywindow to define the
scale at which the data is turned
off and on.Also See
— MORE INFORMATION

|
Copyright © 2020 | SeisWare International Inc. | All rights reserved |