Project Tools: Georeferenced Images
The Georeferenced Images dialog box is used to turn on images in the 3D View or Map View windows, and to access the Import Georeferenced Image tool. used to add new image files to the project. To open this dialog box, from the View menu in the 3D View window or the View menu in the Map View window, select GeoImage.

Display Image
Place check marks or select a surface to indicate how you want the image displayed.
Opacity: Use the slider or enter an opacity value that will be applied to all visible images. 100 is fully opaque and 0 is fully transparent.
3D Bottom: Display the image on the bottom of the AOI in the 3D View window.
3D Top: Display the image at the top of the AOI in the 3D View window.
Basemap: Display the image on the map in the Map View window.
Surfaces: Open the Choose on Surface dialog box to select a surface upon which to overlay the image.
Image: The name of the image.
 Add: Open the Import Georeferenced Image dialog box to add a new image to the project.
 Delete: Permanently delete the selected images from the project.
Import Image
Click to open the Import Georeferenced Image dialog box and add an image file to the project.
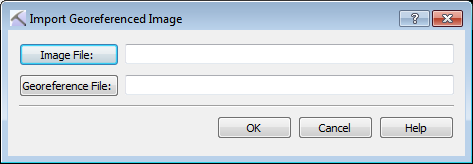
 Image File: Select an image file. Choose from *.tif, *.jpg, *.png, or .*.gif.
 Georeference File: Select the corresponding georeference file. This is required.
Georeference files, commonly with the extension .tfw, are text files that contain specific information about where the image should be placed geographically. They should contain information in the following format.
Line 1: X dimension of a pixel in map units
Line 2: rotation around the Y axis
Line 3: rotation around the X axis
Line 4: NEGATIVE of Y dimension of a pixel in map units
Line 5: X coordinate of center of upper left pixel
Line 6: Y coordinate of center of upper left pixel
In the following example a pixel is 2.4000 map units square, there is no rotation, and the upper left pixel has a coordinate of (441794.4342,5094101.4520).
2.4000
0.0000
0.0000
-2.4000
441794.4342
5094101.4520
— MORE INFORMATION

|
Copyright © 2020 | SeisWare International Inc. | All rights reserved |