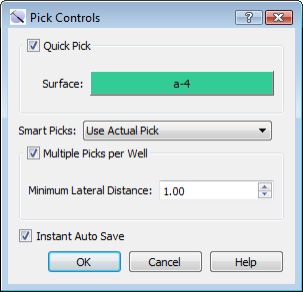
Pick Tools: Pick Controls
 The Pick Controls dialog box allows you to turn on Quick Pick mode, select the surface to pick, and control how pick interpretations are placed and saved. You can open this dialog box by clicking
  on the Buttons toolbar in the 3D View, Cross Section View, and Map View windows.
Quick Pick: Turn on Quick Pick mode for the entire project. When you turn on Quick Pick the Well View andPick Information windows will not open when you are in Pick mode, allowing you to make your pick interpretations much more quickly.
Surface: Open the Select Quick Pick Surface dialog box to select the pick surface. The selected surface will appear on the Quick Pick button on the Buttons toolbar in each main workspace, with the surface color applied ( ).
).
Smart Picks: Select a picking behavior from the list to determine where picks are placed along the well bore.
Use Actual Pick: Place the pick on the exact location of the cursor.
Local Maximum: Snap the pick to the local maximum log curve value.
Local Minimum: Snap the pick to the local minimum log curve value.
Largest Attribute Change: Snap the pick to the location of greatest change along the curve.
Multiple Picks per Well: Turn this on to allow multiple picks per well on horizontal wells where the well bore intersects the surface more than once.
Minimum Lateral Distance: The minimum distance allowed between multiple picks on a horizontal well. Note that when the lateral distance between pick values is less than the grid increment, an average of the two values will be used in the gridding algorithm.
Instant Auto Save: Save picks as they are made. Picks are saved to a file called autoSaved.pix. Note: If you are working in a large project you may want to turn this off for improved performance, and then manually save picks at regular intervals.
— MORE INFORMATION

|
Copyright © 2020 | SeisWare International Inc. | All rights reserved |