Well Template Designer: Well Template Tree
The Well Template Tree dialog box, is used to select tracks and data items to display in the well template and to turn data items on and off. When you open Well Template Designer for the first time, the tree will display a folder with the template name, but you will need to add the objects but using the icons or by right clicking on the template folder. Note: When you add data objects they are drawn in the order added but you can re-order them by selecting them and using the up and down arrows.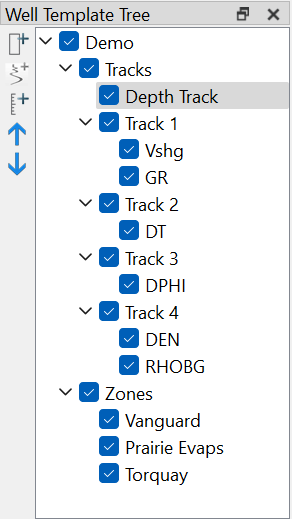
Use the Add Log Curve, Add Curves, or Add Depth icons to add data to the Well Template. To add zones, click on the Zones data folder and in the Well Template Properties select your Zones list.
Once data has been added to the scene, place a check mark next to the individual data items or data folders that you want visible in your scene, and remove the check mark from items or folders you don't want visible.
Select any data item in the tree to adjust its properties in the Well Template Properties dialog box in the Log Template Builder.
To rename a folder right click on the folder in the Well Template Tree, select Rename and enter the new name in the editable text area. Click Enter to save the changes.
Well Template Tree Icons
 Add Log Track: Adds a new log track to the right of the existing log tracks. Select whether to add curves by using either a Log Curve Name or by using an Alias. Select the curves to be added into the log track by opening the Select Data dialog below. This is the same dialog that will be displayed when using Add Curves.
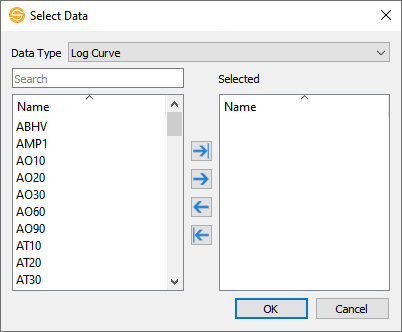
 Add Curves: Add log curves to the selected log track. This will open the Select Data dialog. Add curves by using either a Log Curve Name or by using the Alias. Move the desired curves to the Selected side by using the arrows. Then click OK to add them into the track.
 Add Depth Track: Adds a depth track. This track only shows depth increments.
 Move Up: Moves the selected data item up the tree and moves the position in the drawable area. Use this to re-order tracks.
 Move Down: Moves the selected data item down the tree and moves the position in the drawable area. Use this to re-order tracks.
Shortcut Menu Options
The following options can be selected from the shortcut menus in the Well Template Tree dialog box, opened by right clicking on any folder or object in the tree. Note: Not all options are available for all folders or data types. Options that aren't available for the selected folder or object will be grayed out or not present in the list.
Add Log Track: Adds a new log track to the right of the existing log tracks. It will ask which curves should be added into the log track by opening the Select Data dialog below.
Add Depth Track: Adds a depth track. This track only shows depth increments.
Remove : Remove a data item from the scene.
Remove All Children: Removes all of the data items in the selected folder from the display. The empty folder will not be removed.
Rename: Rename the folder or data item. When selected the item folder will become editable inline. Click Enter to save any changes
Add Curves: Add log curves to the selected log track. This will open the Select Data dialog. Add curves by using either a Log Curve Name or by using the Alias. Move the desired curves to the Selected side by using the arrows. Then click OK to add them into the track.
Move Up:Moves the selected data item up the tree and moves the position in the drawable area.
Move Down: Moves the selected data item down the tree and moves the position in the drawable area.
— MORE INFORMATION

|
Copyright © 2020 | SeisWare International Inc. | All rights reserved |