Seismic Display Properties: Horizon Graph
The Horizon Graph dialog allows you to set up the horizon graph that
optionally
appears at the bottom of the seismic display.
 How do I display a graph below my seismic display?
-
Select the Horizon(s) for display.
-
Ensure that Show horizon graph is turned on.
-
Specify your Graph Height and Axis Direction and Graph Scaling preferences.
-
Click
 to get back to
the Seismic
Display Properties.
to get back to
the Seismic
Display Properties. -
Click
to display.
General Information
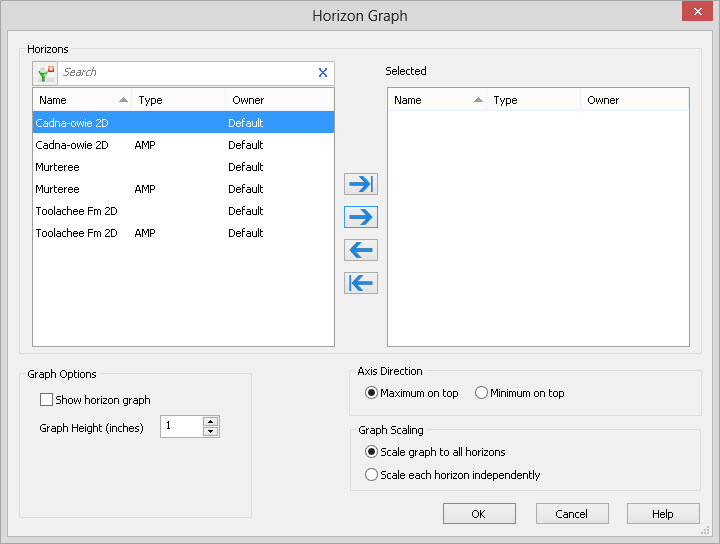
Select Horizons to Graph
Select the horizons that you want displayed in a graph under the seismic display. Left click to select a horizon, or use the Ctrl key on your keyboard to select multiple horizons, and then use the selection arrows to move the horizons to the Selected list. Alternately, you can move a single horizon to the Selected list by double clicking on it.
To help you make your horizon selections, you can sort any column by
left clicking
on the column header, you can apply a filter ( ), or you can type a search string
into the search
bar to limit the list using Name,
Type, and Owner
information.
), or you can type a search string
into the search
bar to limit the list using Name,
Type, and Owner
information.
For additional selection and navigation options, right click on the list to access the shortcut menu.
Graph Options
Show horizon graph: You can quickly turn off the horizon graph rather than having to remove the horizons from the Visible Horizons list.
Axis Direction
Specify the orientation of the horizon graph.
Maximum on top: Put the maximum value at the top of the graph and the minimum value at the bottom. Use this when mapping amplitudes for peak horizons.
Minimum on top: Put the
minimum value at the top of the graph and the maximum value at the
bottom. Use this when mapping amplitudes for trough horizons.
Graph Scaling
Specify how the graph will scale the visible horizons.
Scale graph to all horizons: Use the combined data range of all the visible horizons when drawing the graph.
Scale each horizon independently: Use the data range of each individual horizon when drawing that horizon. This is most useful when plotting structure and amplitude horizons together. Note: Only the values from the first horizon in the list of visible horizons is annotated.
Note: Changes will not be applied
until
the or  button has been clicked in the
Seismic Display Properties window.
button has been clicked in the
Seismic Display Properties window.
Also See
- Seismic Viewer
- Seismic Viewer Display Properties
- Horizon Graph: displays horizon graphs without seismic
— MORE INFORMATION

|
Copyright © 2020 | SeisWare International Inc. | All rights reserved |