Seismic Viewer: Generate Synthetic
You can quickly generate synthetics and display them in the Seismic Viewer to compare them with your seismic data.
-
Click on the Generate Synthetic icon (
 ) or select Generate Synthetic from the
Well Menu to launch the
Generate Synthetic dialog.
) or select Generate Synthetic from the
Well Menu to launch the
Generate Synthetic dialog. -
Select the well from the Well List. Note: You can do this from the list, or by clicking on the well symbol in the Seismic Viewer or on the Basemap.
-
Select the Curve Inputs. Note: As a minimum, you will need a sonic curve and a velocity curve.
-
Set your Wavelet Options. All parameter changes are reflected in the image as they are updated on the fly until the synthetic is saved.
-
Select if the synthetic should be displayed in a track, or as a synthetic trace.
-
Left click on the seismic display where you want the synthetic inserted. The synthetic should appear where you clicked. Note: you can still modify the wavelet parameters at this point and the synthetic will update to show these changes.
-
Close the dialog when finished.
-
Re-launch the Generate Synthetic dialog.
-
Change the Wavelet Options. The dialog uses the selected well as well as the Synthetic Name to determine which synthetic you wish to edit. Changes to the synthetic will immediately be reflected in the synthetic on the seismic display.
-
Re-launch the Generate Synthetic dialog again.
-
Change the Output Options if necessary.
-
Click
 .
You will now have a saved version of your synthetic that can't be edited.
.
You will now have a saved version of your synthetic that can't be edited.
General Information
Well List
Select a well that you want to generate a synthetic for by left
clicking on the well name, or by clicking on a well symbol on the
Basemap or in the Seismic Viewer.
To help you make your well selection, you can sort any column by left
clicking
on the column header, you can apply a filter (![]() ), or you can type a search string
into the search
bar to limit the list using UWI,
Name, or Owner
information.
), or you can type a search string
into the search
bar to limit the list using UWI,
Name, or Owner
information.
For additional selection and navigation options, right click on
the list to access
the shortcut
menu.
Once you have selected the well, and specified all desired parameters, you insert it into the seismic display by left clicking on the seismic display. The synthetic will be inserted and the dialog will close.
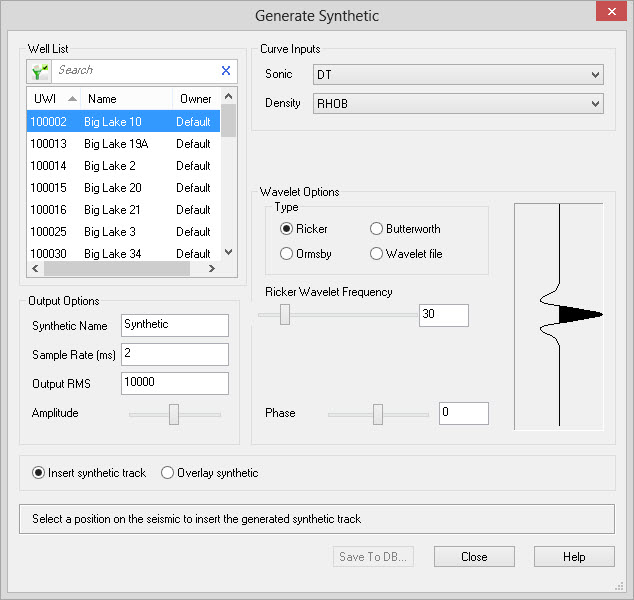
Curve Inputs
The Sonic and Density fields will populate if there is an available curve.
Sonic: Use the default sonic curve, or select a curve from the drop down list. Curves in the list can be sorted by clicking on the column headers, and limited by typing a search string into the search bar.
Density: Use the default density curve, or select a curve from the drop down list. Curves in the list can be sorted by clicking on the column headers, and limited by typing a search string into the search bar. If the well has no density curve density values will be calculated using Gardner's equation. To remove the density curve select Clear Selected Items from the drop down list.
Wavelet Options
Select your wavelet and adjust the parameters.
Available wavelets are:
Output Options
Synthetic Name: This is the name the synthetic will have if written to the database.
Sample Rate: The sample rate, in milliseconds, for the output synthetic.
Output RMS: Specifies an output RMS value for the generated synthetic. This allows you to balance the data with the existing seismic in your project.
Amplitude: Adjust
the
slider to increase or decrease the amplitude of the data relative to
the seismic.
Synthetic Type
Insert Synthetic Track: Inserts the synthetic into it's own unique track. The synthetic will be displayed vertically at the position specified.
Overlay Synthetic: Insert a single synthetic trace over of the seismic display. This option can be
used to draw synthetics vertically as well as along a deviated well
path.
Generate Synthetic Operations
Save To
DB: This
button allows you to write the synthetic out to the database. A
dialog will open up giving you the option to override the synthetic name
and add an optional description. After writing the synthetic to the
database it will be available for normal insertion using the Insert Synthetic dialog. Note: this item is disabled until
the synthetic has been inserted into the seismic display.
Also See
— MORE INFORMATION

|
Copyright © 2020 | SeisWare International Inc. | All rights reserved |