Project Tools: Plot Controls
The Plot Controls dialog box is used to enter the scale, margin, and output settings for hardcopy output. To open this dialog box, from the Actions toolbar in each main workspace, click ![]() . Once you set up your plot controls, click
. Once you set up your plot controls, click  in the dialog box. To create the hardcopy, on the Actions toolbar, click
 ![]() .
.
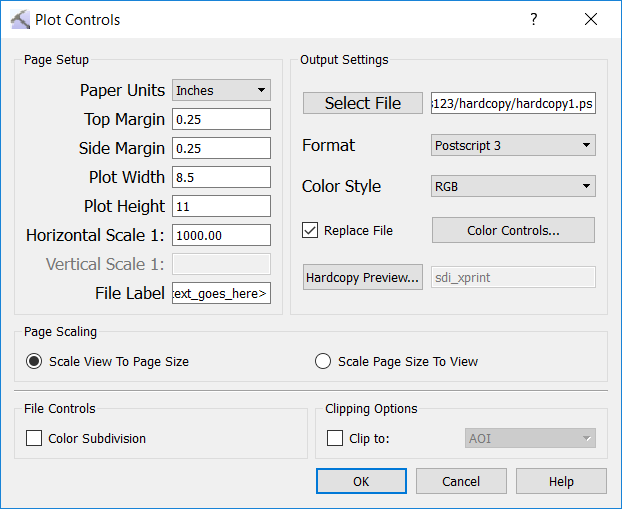
Page Setup
Paper Units: Select the units you want to use to set the margins for the hardcopy. Choose from Inches and Centimeters.
Top/Side Margin: Enter the margin size in the Paper Units selected.
Plot Width/Height: Enter the dimensions of the paper you will be printing on in the Paper Units selected.
Horizontal/Vertical Scale 1: For hardcopies generated from the Map View and 3D View windows, enter a scale value. Use a whole number to scale the printout relative to the real world, in either inches:feet or centimeters:meters, depending on the project units. When printing cross sections, if you want your vertical scale to be different from your horizontal scale, set the Vertical Scale accordingly. This will change the Vertical Exaggeration in the Cross Section Scale dialog box.
File Label: Enter text for the name of the document. This is not the same as the Title.
Output Settings
 Select File: Select a location and enter a name for the output file.
Format: Select a format for the output file. Choose from PDF, Postscript 3, Encapsulated Postscript, CGM, HPGL, JPEG, or CGM ASCII. You can only output seismic, culture and fault polygons in JPEG format.
Color Style: Select a color style for the hardcopy. Choose Grayscale, RGB(desktop printers), or CMYK(plotters).
Replace File: Turn this on to overwrite the existing file every time you generate a hardcopy. This is useful when you are sending images to a printer or plotter, and don't need to keep a digital copy. When this is turned of, an incremental number will be added to the file name each time you create a hardcopy.
Color Controls: Open the display controls dialog box of the current window to make adjustments to the display parameters, including background color.
 Hardcopy Preview: Open the Default Applicationsdialog box to choose the default applications use to open hardcopy files after they are created.
Page Scaling
Scale View to Page Size: Keep the page size as defined, but adjust the scale to make image fit on single page.
Scale Page to View: Keep the scale size as defined, but use as many pages as needed to print the whole view.
File Controls
Color Subdivision: Create a hardcopy with better color gradients. This will increase the size of the file.
Clipping Options
Clip to AOI: Crops the hardcopy to the current display area of interest.
Clip to Annotation shape: If you have a rectangle annotation defined, this annotation shape name will be listed in the drop down menu. Select the name to crop the hardcopy to the limits of the rectangle annotation.
Print Preview
Click after completing the setup. You will enter print preview mode, allowing you to get an idea of your final display. Use the rulers on the edge of the window to help visualize and verify the final dimensions of the hardcopy. You will not be able to zoom, but you can pan your display. Click ![]() to generate the hardcopy and exit print preview mode.
to generate the hardcopy and exit print preview mode.
|
To show:
|
Enter this
|
| 1 in: 1000 m | 393.70079 |
| 1 in : 500 m | 196.85039 |
| 1 in: 100 m | 39.37008 |
| 1 in: 50 m | 19.68504 |
| 1 in: 20 m | 7.87402 |
— MORE INFORMATION

|
Copyright © 2020 | SeisWare International Inc. | All rights reserved |