Log Editor: Seismic Properties
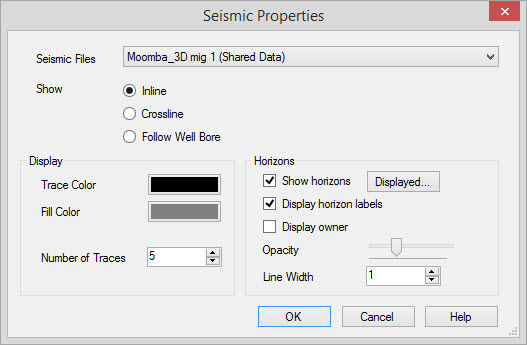
The Seismic Properties dialog box is used to
select the seismic file to display, specify colors, enter the
number of traces to display, and select and manage the horizons to display on the
track. This dialog box will open when you add a new seismic track, and edit the properties of an existing track.
How to Generate a Seismic Track
- Click the Add Seismic Track icon
 or select Add Seismic Track from
the Tools menu. This will open the Seismic Properties dialog box.
or select Add Seismic Track from
the Tools menu. This will open the Seismic Properties dialog box. - Select a file from the Seismic Files list, or select the file on the Basemap.
- Adjust
the Display and Horizonsettings.
- Click
 .
.
Seismic Files
Select the seismic file you want displayed in the track. The seismic
traces that are displayed in the track will either be centered on the trace
that is closest to the well that is currently selected, or displayed along the deviated will bore.
Seismic File: From the list, select the
seismic file you want to display in the track. To help you make
your seismic file selection, you can
sort any column
in the list by clicking
on the column header, you can apply a filter
(![]() ), or
you can type a search string
into the search
bar. You can also select the line from the Basemap, or from Line Properties.
), or
you can type a search string
into the search
bar. You can also select the line from the Basemap, or from Line Properties.
Show: Specify which traces you want
displayed in the seismic track. This option is only available
when you are displaying a 3D seismic file.
- Inline: The track will be centered on the seismic trace closest to the well bore, with adjacent traces taken in the inline direction. Control the number of traces in the track using the Number of Traces field in the Display section of the dialog box.
- Crossline: The track will be centered on the seismic trace closest to the well bore, with adjacent traces taken in the crossline direction. Control the number of traces in the track using the Number of Traces field found in the Display section of the dialog box.
- Follow Well Bore: The track will display the seismic traces along the well bore, with the trace on the left corresponding to the top hole. Control the number of traces in the track using the Show All Traces and Maximum Traces options found in the Display section of the dialog box.
Display
Specify the properties for seismic traces.
Trace Color: The color of the seismic trace.
Fill Color: The color of the peak fill for the seismic trace.
Number of Traces: The total number of traces to display in the seismic track. The display will be centered around the trace closest to the well bore, with the other traces displayed on each side. This option is only available when you are displaying a 2D seismic file, or a 3D seismic file in the inline or crossline direction.
Show All Traces: Turn this on to display all of the traces along the well bore in the seismic track. This option is only available when you are displaying a 3D seismic file along the well bore.
Maximum Traces: Specify the number of
traces to display in the seismic track. The traces are taken at
equal distances along the well bore. This option is only available when
you are displaying a 3D seismic file along the well bore.
Horizons
Specify the properties for horizons being displayed on the seismic track.
Show Horizons: Turn this on to display horizons in the seismic track.
 Displayed: Click to open the Displayed Horizonsdialog box, and specify which horizons you want to display.
Display Horizon Labels: Turn this on to display horizon labels on the track.
Display Owner: Turn this on to display owner information, in brackets, next to the horizon labels.
Opacity: Select the opacity for the horizons and labels.
Line Width: Specify the width, in pixels, for the horizon.
Also See
— MORE INFORMATION

|
Copyright © 2020 | SeisWare International Inc. | All rights reserved |