Project Tools: Open SeisWare Geology
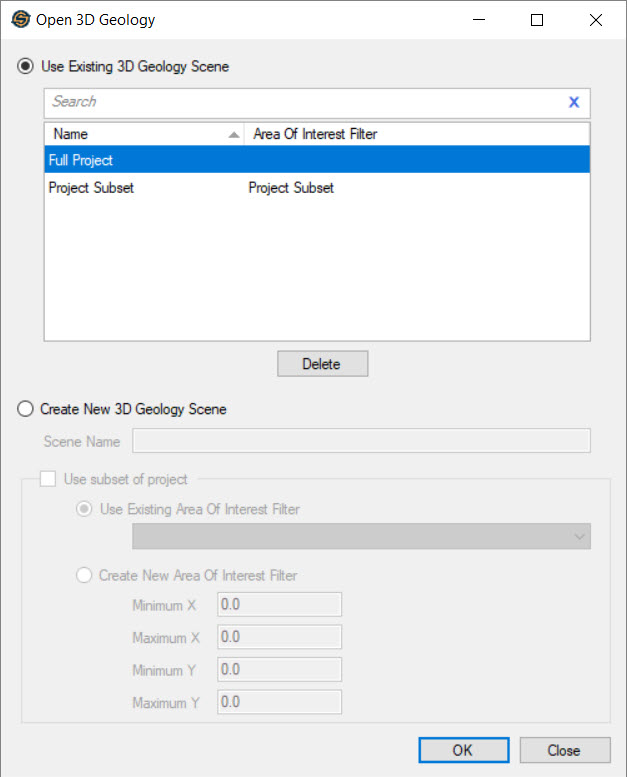 Open SeisWare Geology by selecting 3D Geology from the Launch menu on the Main Launcher. This will open the Open 3D Geology dialog box, which is used to select or create a project scene.
A scene can contain all of the data in your database, or a subset based on an area of interest filter. Property controls are saved to individual scenes, so having multiple scenes allows you to create unique displays.
Use Existing Scene
Use Existing 3D Geology Scene: Select a scene from the list and click  . To remove a scene from the list, select a scene and click
  . Note: A scene named Legacy will appear in your list if you used SeisWare Geology before the ability to create multiple scenes was added to the software.
Create New Scene
Create New 3D Geology Scene: Create a new scene. Select this option if you have no existing scenes.
Scene Name: Enter a descriptive name for the new scene. If you are creating a new area of interest filter this will also become the name of the filter.
Use Subset of Project: Use a subset of all of the data in the database to create your scene. Data not contained within the filter area will not be available in the scene at any point.
Use Existing Area of Interest Filter: Use an existing area of interest filter to define the extents of the scene.
Create a New Area of Interest Filter: Enter the X and Y extents of the a new area of interest filter. The filter will be given the Scene Name.
-
From the Project menu on the Main Launcher, select New.
-
Enter the project details in the Create New Project dialog box.
-
Load well information using the Well Import wizard.
-
From the Launch menu on the Main Launcher, select 3D Geology. Your project data will automatically be used to create a new geology project.
-
From the Launch menu on the Main Launcher, select 3D Geology. Your project data will automatically be used to create a new geology project.
-
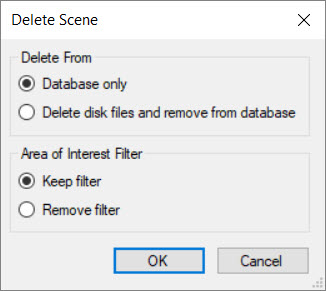 Select the scene you want to delete from the list of existing scenes.
 -
Click
. -
From the Delete Scene dialog box, select from the following options and then click
.
Delete From: Select one of the following options.
Database only: Delete the scene from the list of available scenes but leave the data files in the cache location.
Delete disk files and remove from database: Delete the scene from the list of available scenes and remove all data files from the cache location.
Area of Interest Filter: Select one of the following options.
Keep Filter: Keep the Area of Interest Filter in the project database. This is recommended if you are using the filter in a Geophysics project.
Remove Filter: Permanently delete the Area of Interest Filter from the database.
— MORE INFORMATION

|
Copyright © 2020 | SeisWare International Inc. | All rights reserved |