Geologic Scenario Manager
The Geologic Scenario Manager is an interpretation version control tool that allows you to investigate multiple interpretation scenarios in one project. It automatically tracks all of your interpretation changes (picks, point sets, intervals, and surface headers) and remembers them as interpretation versions with discrete audit trails. You can return to a previous version of your interpretation at any time. To open the Geologic Scenario Manager, from the Scenarios menu in the 3D View window, select Geologic Scenario Manager.
Optional Indexing
When you launch the Geologic Scenario Manager for the first time, you can choose which data types to index and track. If you don't select a specific data type, changes will never be tracked.
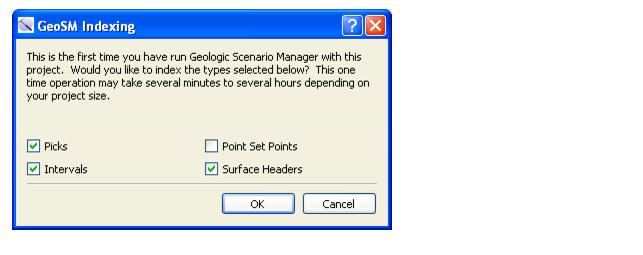
When a project is indexed, a .pkt file is created within the Session directory for each data type selected. The .pkt files are simple ASCII files that list the data within the project. The amount of time it takes to index a project depends on the project size and the amount of data it holds. Point sets are known to take a long time because the program reads each individual point.
Terminology
Sessions
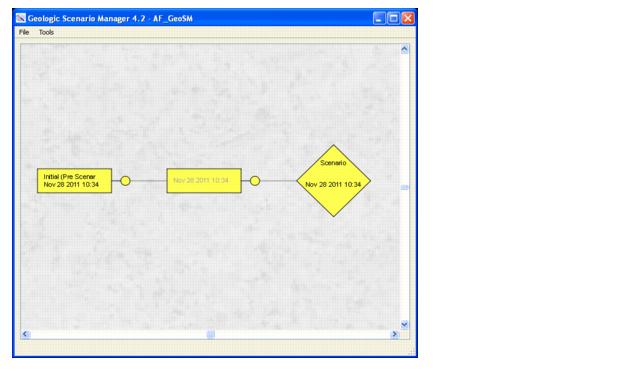 Sessions are represented by rectangles. The first time you open the Geologic Scenario Manager you will create an initial session whose audit trail contains a record of all of the data currently in the project. You will also see another session, where any additions, deletions, and changes will be recorded as you continue to work in your project. The text in the second session symbol will appear grayed out until any changes are recorded.
Decision Point
Decision points are represented by small circles, and are located next to each session. You can create a new branch at decision points by double clicking on the decision point symbol. This will create a copy of the session associated with the decision point, and you can begin to develop a new interpretation scenario.
Scenarios
Scenarios are represented by diamonds. These are found at the end of every branch, and represent all of the data within a branch. The active scenario appears in yellow, and the data associated with the scenario is displayed in your open project. To change the active scenario, double click on the scenario symbol. All of the changes made to your scenario are saved to the session closest to the scenario symbol.
Audit Trail
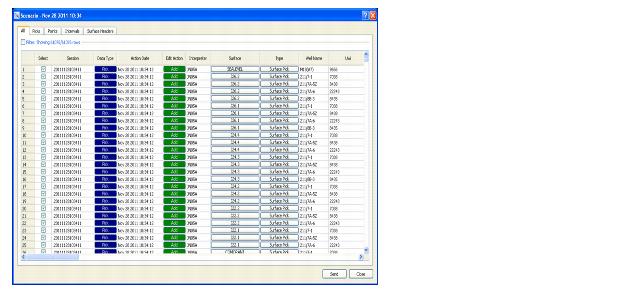
You can see the audit trail for every session and scenario by right clicking on the symbol and selecting Audit Trail from the shortcut menu. For sessions, the audit trail tracks every change, addition, and deletion that is made in the scenario. The audit trail for the initial session will display all of the information data that was in the project the first time the Geologic Scenario Manager was opened. For scenarios, the audit tail tracks all of the data in the scenario branch. Unlike the session audit trail, the scenario audit trail allows you to explore scenarios by removing any action from the list, sending the changes to the project, and observing the changes in the display.
Branch
Branch refers to a series of sessions originating from the initial session. The active branch is displayed in yellow.
Merged Branch
A merged branch is represented by a trapezoid. A merged branch indicates that you have merged two sessions into one session, selecting the overriding data item when it exists in both branches. Pick surfaces (non-framework), picks, grids, horizons, and intervals are merged in this operation. Framework surfaces and point sets are not, and the data from the primary branch is always used for these data items. The merged branch will continue to function like any other branch.
Menus
File Menu: Use this menu to back up the project, and close the window. ![]() See File menu options...
See File menu options...
Tools Menu: Use this menu to start a new session and merge two branches. ![]() See Tools menu options...
See Tools menu options...
Session Menu: Right click on a session to access options specific to a branch or session. ![]() See Session menu options...
See Session menu options...
Scenario Menu: Right click on a scenario to access options specific to a scenario. ![]() See Scenario menu options...
See Scenario menu options...
 . This will update your project, and allow you to see the difference in the interpretation if the change, addition, or deletion was not made.
 . The active scenario will have a small camera symbol next to it, indicating that it contains temporarily copied surfaces.
|
Copy Framework Surfaces to Scenario Grids |
Compare Pick Surfaces to Current Scenario |
|
Framework surfaces only (Surfaces > Framework tab) |
Pick surfaces only (Surfaces > Picks tab) |
|
Permanent copy of surfaces into project, all branches |
Temporary copy of surfaces into project, current branch only |
|
Retains conformability of surfaces |
Does not retain conformability of surfaces |
|
Retains surface terminations |
Does not retain surface terminations |
|
Option available for current branches |
Option available for non-current branches |
|
Grid deleted |
Surface deleted in the Geologic Scenario Manager |
| Pan | Click and drag the display to a new position. Alternatively, use the slider bars. |
| Zoom | Use the scroll wheel on the mouse, or the keyboard shortcuts + and -. |
| Rearrange | Click on a branch and drag it to a new location. |
Grids are shared across all scenarios so iterations of the same grid are not required. This means that surfaces can be easily compared for grid operations and calculations.
— MORE INFORMATION

|
Copyright © 2020 | SeisWare International Inc. | All rights reserved |